Tuesday, August 30, 2011

Line Graphs....How to Make them CONCRETE!!! What, What?!

My 6th graders are having a hard time with line graphs.  It's hard for them to plot ordered pairs, connect the dots and understand what they are looking at.  As I was sitting on the couch looking through some books, I came across an awesome idea....AND I LOVE IT!!!!

The book is called Hands-On Math!  Ready to Use Games and Activities for Grades 4-8.  (Long title... I know... BUT it is sooooooo worth it!!!)
The great thing about this book is that it teaches each concept in 3 different ways: concrete, pictorial, and cooperative groups.  Some things... well most... you have to make except for the pictorial, but the ideas are non- stop, easy to implement, and they home-run hit the point across.  Not to mention the book has tons of higher order thinking questions to keep the students engaged.  

Now that I have done my endorsement-unfortunately I am not getting paid :) --let me tell you about the idea!!

Focus Leslie..... Line Graphs....

So the idea for the concrete method was to buy a peg board, and using golf tees, plot coordinates.  Then use some yarn to make your line for your graph!! After reading I had a huge smile on my face..... YES!!! This is what my students NEED!!!  So I went to Lowe's (puffy heart them), and bought a sheet of peg board for $10. They cut it for FREE into 8 sections of 24"x24".  Each group can have a board.  Then I raided my husband's golf bag.... and finally found some yarn in my closet.  This project cost me $10.77 (tax included).
I am going to put a container under each peg board so it gives the golf tees room to go through the hole.
Plot your coordinates using golf tees.  You can use adding machine tape or sticky tabs to place numbers on the rows and columns.
Up close look at tees.


Next, get your yarn.

Tie it once around the first peg.
Go around all your pegs in the correct order, and then.....
You have your CONCRETE model of a Line Graph!

Students can then write about the trend that took place.  First the trend (line) began to decrease.  Then it increased rapidly.  It decreased a little again, but then held steady for a while before the trend decreased rapidly.  I CAN NOT WAIT TO SHARE THIS WITH MY KIDS!!!! I'm already thinking that I might give them the words and they have to make the line match what I say, or give them a chart and they have to graph it and also place their numbers and labels.  Ideas are going..... Fun fun fun...

Happy Teaching and "Crafting"!!!

Monday, August 29, 2011

Mission Organization: Tables

This year I have tables.  The past 2 years I have had desks that worked beautifully; however, bigger kids need bigger spaces.  Don't get me wrong....I LOVE my tables compared to the normal "junior high desks".  You know the one with the basket at the bottom that you have to slide into with the arm on one side.  How can you do Science experiments with those?!?  If you are able to... my hat is off to you!!!!

One issue with tables is defining whose space is whose.  One way to avoid the dreaded, "So and So is on my side!!!" whining, is to buy colorful duct tape.  I bought this roll at Staples. They even come in ZEBRA stripe!!
Then slap some down the middle of your table.
Now there are 4 defined areas.  Even better.... there is a designated spot in the middle for all the community supplies to live.  Now everyone has equal access to the supplies.
This also defines who can work with who.  "Work with your partner sitting across from you," or "Work with the neighbor next to you."

I also placed  stickers on the side of each table. That way one person is green, one is yellow, one is red, and the other is blue. I placed some tape on top to help prevent those grubby fingers from picking off my stickers :)
I just call out whatever color I want to go get whatever or to start the lab experiment or to line up....

Tune in tomorrow for another tip on where to put all their stuff when you have absolutely NO STORAGE!!

Hope you all are having a happy back to school week!!!

Sunday, August 28, 2011

Guatemala Giveaway WINNER!!!

I did a Giveaway in honor of my Guatemala Mission Trip and since I am soooooo close to 100!!!!  With out further ado....

The WINNER is TARA from

Congrats friend!!!!  Shoot me an email at lesliecragwall@gmail.com with your address and info and I will send it in the mail this week :)

Thank you all for reading, following and supporting.  It really means so much to me!


New Teacher Advice Linky Party

It has been a while since I linked up, but I found a new party about New Teacher Advice that I wanted to join at

For the past 2 years, I have run my classroom with the help of a timer.  I live and die by the timer and my students know it after the first week of school.
I bought it at Wal-Mart for about $5.00 and it been worth it!  It's also magnetic which is a double plus because I can keep it attached to my white board and not lose it.  One of my students asked me this week,"Mrs. Johnstone, why do you live and die by the timer?" My list of answers to her was something like this:
  1. Studnets know exactly how long they have to do something.
  2. I can talk forever and love to talk, so it keeps me from running my mouth.
  3. It makes sure that when I am having the students talk about their learning for 2 minutes...it doesn't run to 5.
  4. It keeps me able to teach Math AND Science... I would totally lose track of time and end up having to cut Science short.
  5. It sets the time for recess and I don't have to worry about bringing my phone since I always forget to wear a watch.
  6. It BEEPS!!!! Super signal that students' time is done and time to move on.
LOVE my timer.... if I lost it.... I would run to the store during conference to get another one.  I have used mine so much that the labels on the buttons has worn off. 

I still wish I had used one in my self contained 3rd grade class.  I could have found the time to do S.S more often if I had I think.

What was I so worried about???

This past summer I had been flipping out over teaching 6th graders.
  • Were they going to have that dreaded "attitude"?
  • Can I still give high-fives or will they think I am stupid?
  • Will they still want to get on the carpet and read with me?
  • Will they get my jokes?
  • Could I possibly love them as much as I did my 4th graders?
Lots of questions and concerns were put to rest after this first week:)  I LOVE THEM!!!! They laugh at my jokes (more often than my 4th graders.... probably b/c they understand them), they give me high-fives in the morning, and say "Hi Mrs. Johnstone,"  they got on the carpet the 1st day and let me read to them!!! AND....even better.... they commented on the pictures and story!!!!! Last but not least I have hardly come into contact with the "adolescent attitude" that scared me so much!

These kids are just like my 4th graders... just in bigger bodies, and I am loving teaching them!

Wish I had more to post about... but that's about it!  :)  Hopefully I will get some kinda craft stuff going this week!


HOPE YOUR FIRST WEEK GETS RID OF YOUR JITTERS TOO!!!

Wednesday, August 24, 2011

Closing the NOTEBOOK/JOURNAL..... and GIVEAWAY Reminder :)

Don't you hate those ginormous journals that have stuff just pouring outta them and every paper starts to get folded and tattered because the journal won't shut???  Well, I have a solution.... and sound like I am on an infomercial!!

I have had some questions in the past about closing the journals.  I wrote about it, but pictures make it so much easier to understand:)   You will need:
                                     

You can also buy them at Walmart. I bought this bag at Walmart for a little over $5.00, used 80 of them and we hardly put a dent in this bad boy.

Also needed: Handy-dandy hole punch.  You can see how enormous the rubber bands are here. 
Step 1:  Punch hole in the back top outside corner.  I didn't do it on the bottom so kids would be less tempted to play with it.
Step 2:  Put the rubber band through the hole like this:
Step 3:  Take the large loop and go through the small loop like this:
Step 4: Pull the longer loop tight:
TA-DA!!!!!


Now you can close that journal that is overflowing with knowledge and foldables!!!!!


Quick reminder:  Don't forget to enter my  
Just click on the word Give Away and you will go to my link.  I am soooo close to 100 and would love to give away the bracelet and pen with 100 followers!!  Thanks for reading and supporting!! :)


Sunday, August 21, 2011

Guatemala Giveaway!!!!

I'm almost there.... 100 Followers :)  Thanks yall!!!!  I've gotta prize... but first let me tell you about this...

It's been one full week since I have been home.  It has been really hard trying to come to terms with the abundant blessings we have here in the US.  I went thinking I was going to be blessing others by building 2 houses and 2 stoves.  I was mistaken.  By the end of the first day, I was the one who was blessed beyond measure, and to see how much the Guatemalans work, smile, love and care for one another.... indescribable.

They say "Buenos dias" to EVERYONE that passes by in the morning.  Then "Buenos tardes" to EVERYONE who passes in the afternoon.  Then at night, "Buenos noches" is said each time you pass someone.  And they look you in the eye! 

What would our life be like if we did that to everyone who passed us by?
Coloring pages after we shared about Jesus being the Good Shepherd.

Pedro (dad) and Ronnie (son) who we built a house for.  Mom and sisters are not pictured.  They lost their house in the May mudslides.

Emerson and I.  We built this stove for him and his mother.  LOVE THIS KID!!
 I made a power point presentation... but it is not uploading correctly :(  Any tips????

Soooooooooo now I am sooooooooo clooooooooose to 100 followers!!!  I knew I was getting close when I went to Guatemala, and I had a light bulb moment.  I decided to purchase my prize there!  So whoever wins gets these lovely beauties from Guatemala!!
Pen and Braclet
Pen reads Jacks of All Trades-- made by a Guatemalan

Bracelet on... it has 3 different size closures for different sized wrists. Also made by a Guatemalan.

HOW TO WIN:  (I have never done this before.  Thanks Yearn to Learn for giving me some tips!!!)

1) Be or Become a follower of my blog and leave a comment saying you follow.
2) Put my button on your blog.  Leave a separate comment.
3) Share the news and blog about this give-away.  Leave me a link to your post on another comment. 

That's 3 ways to enter!!! I will be picking a winner next Sunday at 10pm central time!!! 

THANKS TO ALL OF YOU FOR READING!!!!!

Thursday, August 18, 2011

Teacher Survival Kits... Brought to you by PINTEREST!

If you do not know about Pinterest yet, you have to go to the link!!!! Go now!!! But please come back so you can find out what I made today. :)

About a month ago, I found this lovely teacher gift idea at one of my favorite blogs,
Bee in our Bonnet


The lady is super crafty and makes some of the cutest things ever for her kids teachers and for her home.
So I made my own for a couple of my closest teacher friends.
This project takes no time at all, and is really cheap. These are my materials:
I used the fishing boxes from Walmart (less than $5.00) and spent $5.00 at Staples on the items below. I split them though between the two kits.
 I also bought 2 bags of candy at Walmart for about $5.00 as well.
I just used the Starbursts and kisses though... I saved the Lifesavers for myself.... and my husband :)


After I got everything ready, I put my items in my kits.  When I was in Guatemala, I had pens made with my friends' names on them.  It was SUPER cheap and SUPER CUTE!!! I have a pen to give away once I reach 100 followers. (hint hint.... :)


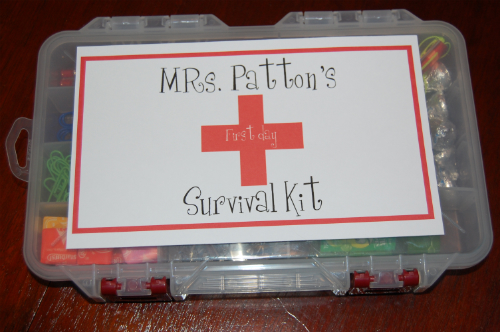
 I added a little Anti-bac that I had bought at Bath and Bodyworks a long time ago.  It fit perfectly.  So now I needed labels. At Bee in our Bonnet she has a template you can download, but it didn't work very well for me, so I made my own using Printshop.  LOVE IT!!!!!!!  You have to get one!!! Cheap and does TONS of stuff...

Anyway.... I used one sheet of card stock and made 2 labels on the one sheet.  Then I cut them with my new trusty tool  from Hobby Lobby.


Then I used that Crafty glue I have a love hate relationship with (it is becoming more loving however) to glue my label onto my red card stock.

Trim the left overs and you have a wonderful label.  Then I put some adhesive on the back of the red card stock and attached it to my kit. I didn't want to go out and buy more ribbon, but I had some Christmas red ribbon, which I felt was just as good.


Add a little bow and you have a great gift for any friend!!!  I think I am going to use this idea again at Christmas....


Happy Crafting!!!!!


Sunday, August 14, 2011

VBS in the Class Part 2

So I have been out of the loop on my blogging for the last 2 weeks and I am missing it!!! Last week our church hosted VBS- Pandamania style by Groups; it was also the same week that I was in Guatemala on a mission trip... which I will post about next.

I usually help paint, decorate, and do crafts for the little 3yr-6yr olds during VBS, but since this year I was not going to be able to do that, I decided I would do mucho decorations.

How does this relate to my classroom???? Well, unfortunately we don't do "themes" at my new school :(  but it is both a blessing (on my checking account) and a curse (what do you mean we don't have a theme?? what will my classroom be based on now...) Anyway... back to how to use it in the classroom... so ADD...
You can use any of these ideas to do a JUNGLE  theme in your own room! Check out these pics... hope they inspire you!
This is the entrance to our church.  A wonderful member built this bridge for the kids to cross.  They LOVED it! The vines and leaves really made it feel like a jungle.
Here is a mural that I painted.  The panda is made from 2 sheets of poster board taped together.  A crafty friend of mine and I traced the panda on the poster boards and we each painted 10 different pandas. She painted this guy :)
We had a ton of lanterns and umbrellas from Hobby Lobby.  We hung them from the ceiling using fishing line and paper clips... I still think paper clips rank in my top 5 inventions.

Here are a couple of waterfalls.  The top one is made from a scene setter that we had left over from last year.  The bottom is made from blue plastic table cloth cover.  We got a huge roll for $17.00 and even made a pond from it!


Speaking of ponds... This is our massive stage!  We made this pond using blue tarp and had it come off the stage and go to the floor in and around a kiddie pool we also had.  Add a couple of pandas and we are good.  I love that one spitting!
Carpet tubes donated by a local carpet store.  All we had to do was tape some bamboo paper around it.  
This is our stage.  Too bad the back lights aren't lit.  The made the soji screens green.  All the characters were traced onto Styrofoam sheets and cut out with a hot knife.  Another top 5 invention... Then hand painted.  The cave was also made from a a Styrofoam sheet and covered with brown paper to look like a cave.

We used green cellophane to cover the lights.  I have seen teachers use the plastic table cloth cover to do this as well in their classroom.  Gets rid of that horrible fluorescent lighting :)


LOVE the pandas!!! They really changed the the atmosphere to a fun loving one!

This is the dining room. A man volunteer (so helpful) helped me hang this white cloth that we had using PVC pipes and a little wire.  The kids felt like they were in a tent.  The doors were covered in wood panels that I made from insulation foam last year.  The red roof was done also using insulation foam (my husband painted most of them...LOVE him) and some awesome ladies figured out how to hang them at an angle using fishing line.  AWESOME!!

Well... that's about it!  I hope you get inspired with some ideas on how to use this for a jungle classroom. 
Be sure to contact your local churches after VBS.  Most of them are more than willing to donate decorations that will most likely be trashed at the end of the week, and you DON'T have to make them or buy them!

Can I get an Amen?!?! :)